Archive for the ‘Practice’ Category

Llangwyfan

Wednesday, December 8th, 2010

It’s a strange thing, going into a semi-derelict building. You of course have the overwhelming sense to just get away from there as quickly as possible before something bad happens. Curiosity soon takes hold though, and the traces of the lives that have vactated these buildings draws you in. These old hospital wards near Denbigh feel like they are rapidly being dragged back into the ground by the overgrown nature that surrounds them.

You can see the full series [here].

Anyone for a swim?

Friday, November 19th, 2010

This was most definitely not the time of year to be casually wandering across the beach for a swim. Minor issues like single figure water temperatures and an impending storm didn’t stop these two hardy ladies however!

Intimate moments

Thursday, November 11th, 2010

Couple-photoshoot-chester

This is a bit of an outtake from a photoshoot I did with a great couple in Chester. This was way off our shortlist for the session, but strangely, it’s one if my favourites. I think this is because, despite all the fun we had doing the shoot, this was a genuine moment of intimacy between the couple.

Ruthin’s Stone Circle

Tuesday, November 2nd, 2010

Stone Circle Ruthin, Denbighshire

It was quite a surprise to find a perfect stone circle, standing tucked away in a field near the centre of Ruthin. I have a feeling it’s probably a little of a modern folly, but none the less photogenic for it. Ah, a little research tells me they have only been there since the 1973 Eisteddfod festival, and are known as the Gorsedd Stones of Ruthin (Meini’r Orsedd).

Jubilee Tower 200

Monday, October 25th, 2010

It’s not often you get live drumming, lazer lightshows, multimedia art and fireworks on top of your local 1000 foot hill. The Moel Famau Jubilee Tower 200th anniversary celebrations where a huge success. It was wonderful to see thousands of people braving a evening cold on top of the hill to watch the Jubilee Tower 200 lightshow and fireworks. The last of the big images shows the lantern procession off the hill.

After many requests this week, I am making prints of any of the above images available for purchase as fine-art photographic C-Prints. C-Prints are very high-quality professional prints, printed with archival quality inks on archival paper (like you see in museums and galleries). Contact David for more information on sizing, framing and cost options.


Llanberis

Monday, October 18th, 2010

Llanberis high street & painted buildings with Snowdon behind

Growing up in North Wales, I never understood why Llanberis, the once drearily grey ghost town at the foot of Snowdon, was not reinventing itself from its long gone quarrying roots into a vibrant hub of outdoor-tourism, sporting pretty shops, great places to eat and loads of accommodation to catch the mass of traffic that passed though Snowdonia every weekend. These days, and thankfully, the town is living up to that potential. It’s partly testament to the local businesses there, who have stood fast for years knowing that one day Llanberis would be the logical centre for outdoor-activity tourism in the national park. I hardly recognise the colourfully painted town cowering under Snowdon from my days growing up in Wales. Here’s hope it continues to surprise.

How to photograph fireworks

Monday, October 4th, 2010

How to take great photographs of firework displays

Taking great fireworks photos is easy, and can be done with most cameras with a few manual controls. You need to get a few things right before the fireworks start:

1. Be prepared

Before the event, fully charge your camera’s batteries and if possible carry a second battery in your pocket, near to your body heat. Cold batteries (in cold weather) lose their charge very quickly, so rotate the batteries to keep them warm if it’s very cold. Clear out your memory card and carry a spare. A torch or head torch is a great thing to pack in your bag. Take a drink with you so you don’t need to queue up for drinks and miss the fireworks!

2. Manage your photoshoot time

If you are with family or friends, it’s best to let them know in advance you will be ‘working’ – moving about and not free to chat/socialise. Free up your time and ensure people know not to expect anything from you.

3. Scout the event location

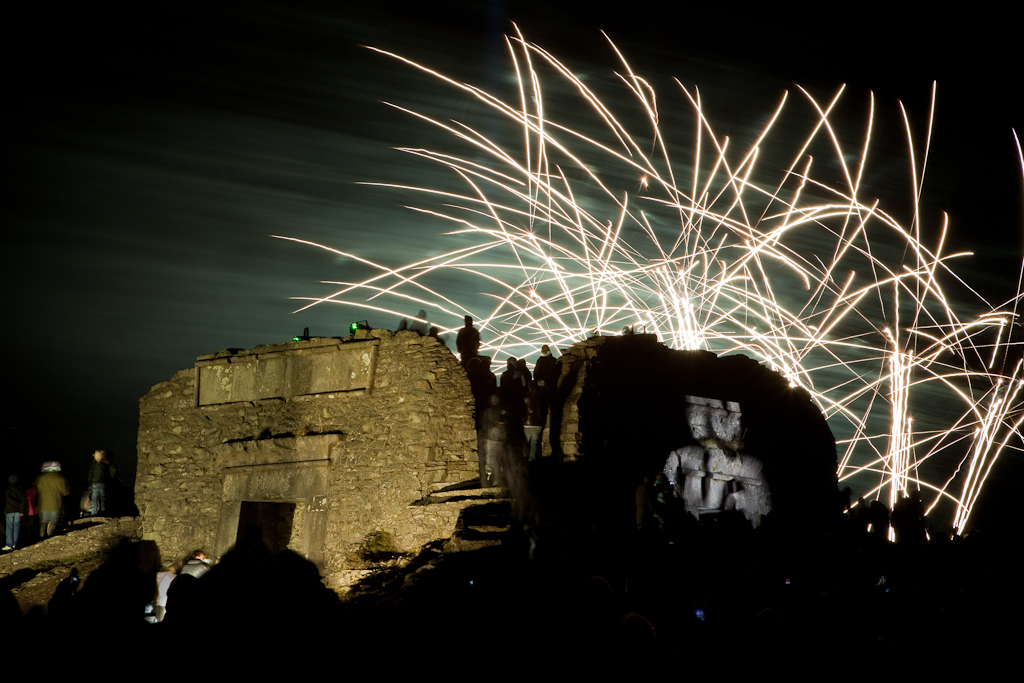
Straight away when you arrive, leave your camera in the bag and have a look around the site for the most dramatic vantage points. Including crowds, trees, buildings or reflections can add drama and context to your firework shots. Big fires can be too bright in the shots, but experiment. Be far enough away from the fireworks to get the sky rockets display in shot, and not cropped in half.

4. Use a tripod

This does not need to be a posh or heavy tripod for this type of work, but you will need one if you want to get great results with longer exposures. Set the tripod up with plenty of room around you, as soon as you can into the evening.

5. Use portrait format

For displays that feature sky-rocket fireworks, working in portrait format (the camera turned on its side on the tripod), means you to get the whole scene in the shot, from the ground to the burst point in the sky for rockets, again creating context.

6. Set the camera up in advance

You are looking for longer exposures here, this will allow the whole of a firework ‘burn-time’ to render on your sensor, creating dreamy colour trails  on your images. You want to be in manual mode. If you don’t usually work in manual mode, check you know how to change the shutter speed and aperture before the event (i.e. when it’s warm, dry and you can see!). For manual shooting start with your settings at a 5 second exposure at F.5.6 aperture is a good place to start. ISO can stay low to help capture the best dynamic range – around ISO 100 to 200. The wide angle end of a lens is often best these shots.

7. Work quickly

Once the fireworks start you don’t have long before they are over, so work quickly and monitor your cameras settings as you start to see the results on your camera’s LCD screen. If required, adjust the shutter speed up or down to make the shots brighter or darker. Stay within the 1-10 second shutter speed range though. You are looking for good bright colours without too many ‘blown-out’ white areas (fireworks that show on your LCD as the larger areas of pure white contain no information and might be over-exposed).

8. Move around

Once you have some great shots from one location, change your angles – you can adjust the lenses focal length, the tripod height and of course your location. Imagine yourself documenting the event for a newspaper – this will force you to be creative, keep moving and keep shooting where others will have stayed still or gone for a drink!

9. Post-process the images for great results.

As soon after the event as possible, get the images onto your computer. Delete what hasn’t worked straight away. If you have the software, using RAW format is best for retaining the most file resolution and colour. Increase the saturation, contrast and sometimes the blacks for high-impact shots. Check the colour balance is realistic, if your software lets you.

10. Publish quickly and widely!

There is no point in taking amazing shots if you leave them on your computer. Send copies to your friends/family, publish them of Flickr or Facebook, but better, if you have local community newsletters, local papers, school website forums, council community updates, local web blogs, etc, get in touch with them. If you follow all the previous nine tips, your pictures should be better than most of the other photographers at the event and you could get published! It feels great to see your images being used, and gives a little back to the local community.

beach storm

Saturday, September 11th, 2010

talacre-beach-seaside-storm

camera motion blur

Thursday, September 9th, 2010

Abstract photography using in-camera motion blur

Using motion blur as a technique for creative photography can be a very satisfying pursuit, allowing abstract fine-art compositions to be created in-camera, needing little in the way of (boring!) time in front of the computer to achieve really striking results. The technique also benefits from being quite straightforward, achievable with most cameras, and also in most choices of location. Perfect if you are lacking creative inspiration in a location.

Why intentionally motion blur images?

Most of us are in pursuit of pin-sharp images, so why choose to spoil our images by intentionally blurring our images? Start by having a look at the gallery below. In removing the recognisable detail from scene, we force ourselves, the photographer, to look only at the colour, texture, contrast and tone in the scene. This translates to us looking much further through a potential image than composition and framing. A great skill to nurture for any photographer. From the viewers point of view the same applies – the images become about colour, texture and tone and not directly about subject.
Another really useful side affect using motion blurring to create abstract photography is the subject-matter really does not matter – you can get equally great results in nature or in the city centre providing you are looking out for colour, texture and tone.

How to creative effective motion blur in-camera

The principle is simple, to use an intentional panning movement of the camera combined with a slow enough shutter speed to sufficiently motion blur an image, so that obviously recognisable everyday detail is removed from a scene, therefore creating an abstract composition. This might mean a traditional landscape images becomes a series of horizontal bands of green and blue or a neon-signed shop front becomes bright streaks of light.

Setting up your camera for blur!

1. Set the camera to shutter priority,
2. ISO as low as possible (ISO 80 or 100).
3. Dial in a shutter speed around 1/30 to 1/125, depending on what your camera will let you do.
4. If your camera has a built in ND filter, as my Canon Powershot G11 does, this can help you get a slow enough shutter speed in brighter light conditions, otherwise just practice this technique in lower light conditions (dusk for example).

The fun bit – taking blurry shots

Taking the shots involves pre-focusing the camera (half-pressing the shutter) on the main subject of your image.
Now, with the shutter release still 1/2 down, carefully move the camera through a quick horizontal or vertical ‘pan’ motion, fully pressing the shutter as the camera passes the main subject area. It’s important to keep panning at a constant speed right through the exposure and after the shutter has closed. This allows the tones in the image to render as horizontal or vertical bands of colour on the end exposure. Sounds fiddly, but will a little trial and error (and a lot of deleting duff shots), you will quickly start to get great results.

Motion blur tips

A monopod or tripod can help you get the blur clearly in one direction only
Experiment with shutter speed from 1/125 sec down to 1/15th sec, depending on lighting conditions.
Use a slightly telephoto focal length – the greater the magnification the greater the blur. Wide angle lenses don’t work so well here.
Look for subjects with bright colours and good contrast.
Work with what you have – if you don’t have an ND filter to work in daylight conditions, work only in lower light conditions.

Post-processing

The beauty of this technique is that the results you get are unpredictable and down to the in-camera skills you build up with practice. There is little left to do on the computer, apart from perhaps a little creative cropping (i.e. the below images are cropped to 1:1 square format to give a fine-art medium format film feel. Apart from cropping, try these tips in post-processing to enhance your results:

If your camera allows, shoot in RAW format for best results.
Increase the contrast of images to get more punch.
If your software allows control of the image clarity (positive or negative sharpness), play around with this to soften/harden the image.
Try saturating the colours somewhat.
Finally, software noise-reduction can be useful, especially in low-light using a point-and-shoot camera.

Moody Snowdonia

Thursday, September 9th, 2010

Snowdonia from Penycloddiau

I am still struggling a bit with the fact this view of the snowdonia hills is now just up the road from the house. It feels it should still involve some hard work to earn a view like this over the hills, but the reality is I can pop out with a point-and-shoot camera and snap shots of views like this while walking the dog. Doesn’t feel real yet, living in the middle of all of this.